Fill with Symbols allows you to fill areas with an assortment of related symbols, creating forests and similar terrain. A set of symbols and other properties can be saved as a setting to be recalled later or used as a drawing tool.
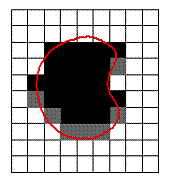
Imagine a rectangular grid is added over all selected objects. The size of each rectangle is the X and Y unit size.
All rectangles with an empty square below are marked to be filled with symbols with a single checkbox by them.
A greedy algorithm tries to fit the symbols to each position. The CX and CY values are how many squares the symbol will occupy. It starts with symbol 1 then symbol 2 etc. This means they have to be sorted with the biggest first.
Symbols are added to the drawing.
Fill with symbols supports collections and other smart symbol properties.
Example:
Create a catalog with the set of symbols you want to include in the filler. Add them to an existing filler catalog if you like.
Remove any Symbol Options which are not appropriate (for example, you might not like random transformation offsets in a forest)
Calculate the size of a unit – it's usually the size of the smallest symbol. Alllow for a little overlap if there is any.
Start Fill with Symbols, select the catalog and add the symbols one at a time, starting with the largest.
Add some single symbols to go round the edge at the end.
Add the CX and CY values of the symbols.
Put the Count number in Count.
Save the setting in #System\Fillers
Test it with Run Now.
Related Topics