Click Tools > Options > Global Layer Settings to change the globla layer settings.
Global Layer Settings allow you to control the layer status of all drawings that you open, overiding the individual settings in each drawing. See the example below to get an idea of how globe layer settngs are used.
Using Global Layer Settings
Click on an area of the dialog bof for more intormation
Start a new drawing based on the 1000 x 800 map template.
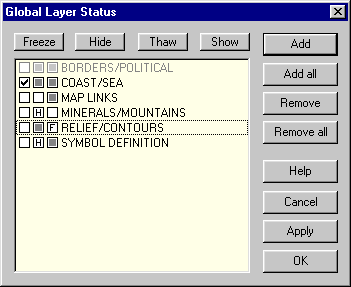
Select Tools > Options > Global Layer Settings. Select Add. Select the COAST/SEA layer, then select OK. Repeat this with the SYMBOL DEFINITION layer, the RELIEF CONTOURS layer. Add a MAP LINKS layer, by selecting Add and adding the layer using the Layers dialog box.
All these layers in the dialog box available for use. You can add more layers from other drawings in the same way. The layers you have added are greyed out at this stage – this means that if you open a drawing with these layers in, they will not be affected by the global layer settings.
Click on the left-most square next to the COAST/SEA layer. A tick appears - this means that when you open a drawing, this layer will always be the current layer if it exists in the drawing.
Click on the middle box next to the MAP LINKS layer. The box becomes clear- this means that when you open any map with the MAP LINKS layer in it, the MAP LINKS layer will be visible.
Click on the middle box next to RELIEF/CONTOURS, then twice on the right box next to RELIEF/CONTOURS. The RELIEF/CONTOURS layer will be visible but frozen if you open an overland map.
Click twice on the middle button next to the SYMBOL DEFINITION layer. The small H means that the SYMBOL DEFINITION layer will be hidden when you open any drawing. This is very useful for speeding up redraws when scanning through maps.
Now open up some maps and see what effect the global layer settings have.
Text Equivalent: GLS