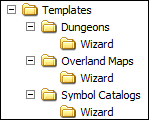
CC3 Templates are stored in the Templates folder. Under this folder are folders for each type of template. In these folders are the fixed-size templates. Each type also has a folder called Wizard containing all the Wizard templates.
|
|
CC3 Templates are stored in the Templates folder. Under this folder are folders for each type of template. In these folders are the fixed-size templates. Each type also has a folder called Wizard containing all the Wizard templates. |
We recommend that you start with an existing Wizard template.
Add any sheets you want, and put a Point at 0,0 on the Template layer of each new sheet. If you don't, any sheets you add are deleted from the drawing when you save. Freeze and hide the Template layer. Keep the size 1000x800. You can change the appearance of the border.
Add Notes as follows (File >> Drawing Properties >> Notes):
One called Resize. This lets the wizard know how to change the size of the template when the user types in values in the New Drawing Wizard. This should be either Scale, ScaleXY, Stretch, or Fixed and the one you choose depends on the type of map border you have.
If you map can be scaled XY (eg it has a width 0 line as a border) put SCALEXY.
If your map can be scaled then stretched if necessary (eg the default cc3 template) put STRETCH.
If your map can only be scaled (ie it must keep its aspect ratio) (eg Allyn's map first in the profantasy.com/cc3 gallery) put SCALE.
If your maps is a fixed size put FIXED (so that people can create specific-sized templates eg for Traveller worlds)
(Optional) Add a note called called OnNewMacro. This is a macro which will run when the drawing is first opened. It could for example open a document with instructions Eg
(Optional) Add a note called OnOpenMacro. This is a macro which runs every time the new drawing is opened. It could set a symbol style and open a catalog, for example.
(Optional) Add some cartouches, for example a compass rose or two, and a scale bar.

Add a symbol for a map title frame, with an attribute in it called map title. Add a symbol called Copyright with an attribute in it called copyright notice. Look at the standard CC3 wizard template and copy these symbols if you like.
(Optional) Add any fill style bitmaps using Tools >> Import PNG fill styles.
(Optional) Create drawing tools appropriate for your map in your own folder of the drawing tools folder.
(Optional) Add symbols into the drawing. The user can work using the Symbols in Drawing button (under Options) rather than picking a catalog if you don't have lots of symbols.
Click Drawing Properties and choose a drawing tool style for the Template, perhaps the one you added above.
Add any effects, and turn them off. Note that many effects won't do what they are supposed to if the user uses a wildly different drawing size to your original.

Save the map as a template in the Templates\####\Wizard folder - where #### is a subfolder of Templates.
Add a text file with the same name as the template, with details of what the template is for, in the Templates\####\Wizard folder.
11. Add a 136x97 pixel PNG file with the same name as the template. This is a thumbnail image of what an eventual map created with the template might look like in the s in the Templates\####\Wizard folder.
Related Topics